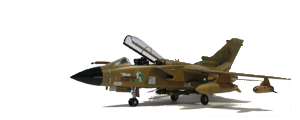


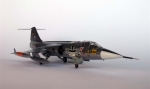
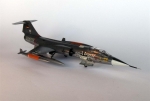
Ok, time to get this one finished, it's been sitting on my bench at 90% for too long. This time it's Italeri's F-104G, another great kit.

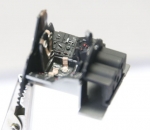
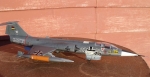
I decided pretty early on to have a shot at some scratch building so decided to open up the side avionics bay and fill it up with scraps of plastic and fuse wire until it looked something like the reference shots that I could find.
I started by cutting out the panel then created the outer box with sheet plastic. The outer cage was left untrimmed until everything else was complete. This made build the avionics box much easier.
The outer panel for the avionics bay was made with thin plastic which heated in hot water then tapped around the handle of a screwdriver. Once the plastic had cooled it stayed in the correct shape.
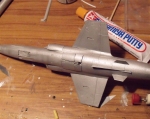
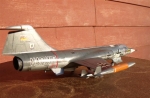
Looking at pics I had always thought the Marineflieger Starfighter had a light grey underside but a little research revaled it is actually an aluminium/silver. Happy with that, I pulled out good old Humbrol 11 and sprayed the under side after some preshading.
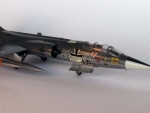
The result was some really nasty blotches and speckles, I had another go thining the paint even more but had the same effect. Asking a few others it seems that Humbrol 11 is just no good for spraying.
I purchase a can of Model master Almumium and acheived what I feel is a much better result.
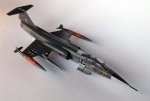
Everything else proceeded as planed, the decals are Modeldecal MD013 which came from Hannants. I've used Modeldecal decals a few times now and find them great, nice and thin and always go on well.
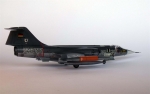
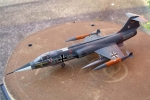
After the final coat of future was sprayed on to seal in a few weathering touch ups I removed the masking tape from the cockpit to find some nasty fogging on the inside of the plastic which (for me) ruined the final model.
So I gently removed the cockpit and applied lots of fine sanding and toothpaste around the problem areas which helped a bit. I also hand painted a thin frame around the back of the cockpit which covered up most of the bits that I couldn't fit. Next time I think I'll use white glue on the cockpit.
Check out our new Online Scale conversion tool. Convert from any scale in any unit of measurement to any other scale in any other unit.