


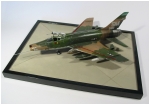
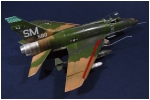
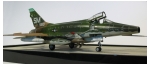
Big, rugged and adaptable. The 'Hun' is another one of those aircraft that stands out due to its aggressive ugliness.
The F-100 was originally designed as a higher performance follow-on to the F-86 Sabre air superiority fighter. Adapted as a fighter bomber, the F-100 would be supplanted by the Mach 2 class F-105 Thunderchief for strike missions over North Vietnam. The F-100 flew extensively over South Vietnam as the Air Force's primary close air support jet until replaced by the more efficient subsonic A-7 Corsair II[4] The F-100 also served in several NATO air forces and with other US allies. In its later life, it was often referred to as "the Hun," a shortened version of "one hundred."
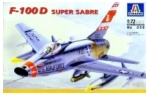
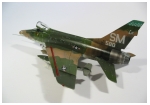
This was built from Italeri's 1/72 F-100 D. The kit provides decals for 3 aircraft, one of which is a USAF version in natural metal finish. I wanted a Vietnam version in SEA camo so I swapped decals with the Hasegawa 1/72 F-100. I then used the Hasegawa kit to try my hand a using kitchen foil to cover an aircraft.
I used the Italeri kit because it has some very nicely engraved panel lines and some decent cockpit detail.
I'm going to go out on a limb here and say I really like Italeri kits. All of the kits I have fit extremely well and they all have really good detail. Not quite the level of some of Hasegawa's or Fujimi's kits but for the price they are a steal. The Italeri decals are also always good for me.
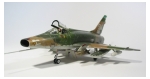
This was also a kit where I tried some seriously scratch building. I cut out the leading edge slats and built the inside with plastic card. I also built the access bay for the Huns guns. All the detail here was scratch built from bits of plastic lying around. The detail here isn't great but for a first attempt it came out well enough.
I used this build as my first attempt at using photo etch details. I purchased the small eduard 'zoom' set which contains some cockpit details. I chose the zoom set because it was my first attempt and wanted something to cut my teeth on.
The photoetch was applied and added to the cockpit after trimming. I think the Zoom set was for the Hasegawa kit because there was no way it was going to fit into the Italeri kit without being trimmed down.
I hand brushed the photoetch and the inside of the cockpit. First lesson learned here, Photoetch really needs to be spray primed on the fret then sprayed the required colour. My brushing skills are not that good and the photoetch lost a lot of detail from gluggy paint and lack of skill.
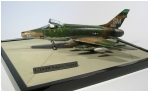
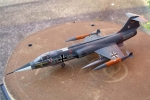
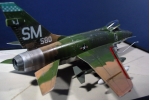
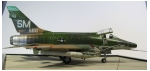
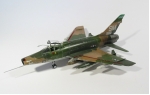
This was my first attempt at a Vietnam SEA camo setup. First I sprayed the red for the insides of the slats then masked them off and pre-shaded with black. Pre-shading wasn't really required as the affect is pretty much lost once all those layers of camo are applied but there are a few spots which show through giving the final paint an un-even look.
I then applied the bottom colour, which is not white. I applied FS 36622 in the form of Humbrol 028. Once this was dry I applied the next lightest colour which was the light tan (FS 30219 - Humbrol 118) before mixing the paint I added 4-5 drops of flat white. I did this for each of the camo colours, more on that later.
Next was was the light green (FS 34102 - Humbrol 117) followed by the dark green (FS 34079 - Humbrol 116) Each of these layers was masked with cut masking tape, normall I would use the blue-tac sausage technique to get a nice feathered look between each camo colour however the photos that I saw show that transition between the camo patterns was quite sharp.
I added a few drops of white to each of the top layers for the scale effect. The idea is that when you see an aircraft from a distance, the distance haze adds 'white' to the aircraft you see.
This generally doesn't matter too much until you are using several colours which are similar. If I didn't add the white, the dark and light greens would look almost the same.
As mentioned, I 'borrowed' the decals for this kit from the Hasegawa box. The decals were very old but had held up well over time and went down with no serious problems.
Before decaling I sprayed floor polish over the entire model to achieve a smooth surface to apply the decals and to protect the model from the washes that would follow.
Once the decals and washes had been finished I applied another coat of Future floor polish to hold everything in.
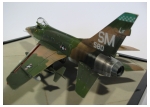
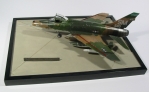
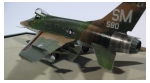
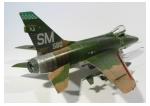
Looking at some of the other really cool kits people have done of the Hun I was really motivated to add some decent weathering to "bang it up" a bit.
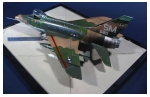
First I applied a wash of Tamiya X-19 Smoke thinned so that it can seep easily into the panel lines. After about 10 mins I dipped a cotton bud in turps and rubbed off the smoke in the direction of airflow.
Then I loaded up the airbrush with a very thin mixture of X-19 and sprayed the staining on the rear fuselage. This was a first for me and was a great lesson in building up layers of paint to get the desired effect. I was very pleased with the result.
Once that was dry I added a small amount of smoke effects and oil stains in various parts of the aircraft using pastels.
Then I loaded up a fine brush and started to add the paint chipping which these birds seem to have a lot of. This is a really fun part of the build as it starts to pop the detail out. It's also a time which is very easy to go overboard as you're generally focussed close-in and don't step back to see the big picture.
I forced myself to take a break every 2 mins so I could keep checking the over-all effect of the paint chipping. This allowed me to stop before I went crazy with it.
Finally, another layer of floor polish was added to give everything an even tone. I was a little too shiny when I first applied it but it dulled down over time.
In the end I was pleased with the result. I learnt quite a few skills in the process and didn't stuff anything up too majorly to ruin anything.
Check out our new Online Scale conversion tool. Convert from any scale in any unit of measurement to any other scale in any other unit.