


The aircraft was originally known as the DH.110; an aircraft designed for both the Royal Air Force (RAF) and Fleet Air Arm (FAA) as an all-weather, missile-armed, high-speed jet fighter. The Admiralty had published a requirement for a fleet defence fighter to replace the de Havilland Sea Venom. However, the RAF chose the Gloster Javelin, a rival to the DH.110, after deciding the Javelin was a cheaper and simpler aircraft. Despite this, de Havilland continued with the project, and by the late 1950s, the Royal Navy had placed an order and the aircraft entered service with the Fleet Air Arm.
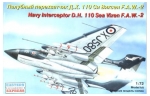
This is the Eastern Express kit, a Russian company who have released quite a few of the older frog kits. This one, along with the Revell version are both from the very old Frog molds.
At the time I built this MPM also had a good-looking kit of the Vixen but it was priced well out of my range. Now, Xtra kit also have new kit out (Based on the MPM one?) which might be a better option nowadays but at the time, for me this was the best way to go.
Even getting the lesser quality Frog version of this kit took months. In the end I found a bagged second-hand one from Hannants in the UK. I think mine had the original frog decals - when it was time to apply them I found they were unusable.
Opening the box you find the normal frog type offerings, lots of flash, lots of sink holes and lots of gaps to fill. The instructions are very basic with a single page which folds out but there are only a few steps so detailed instructions are not really required.
This thing took me months and months to build. There was a large amount of scratch building required and used a good deal of photo etch.
Construction begun in the cockpit area that needed to be built entirely from scratch. First the division wall between the pilot and navigator had be be built so that it would fit correctly on the floor of the cockpit, then the side walls were built with detail later added. I didn't bother with the photo etch set for the cockpit because of budget and the fact that most of the detail would be lost in the dark cockpit.
I used some white metal seats from Aeroclub that are very nice for the price. They did need a bit of resizing to fit into the cockpit but in the end everything went in nicely.
The entire cockpit was painted a very dark grey which I then dry brushed with a lighter grey to bring out some detail.
I built some internal walls for the engine intakes and then added the vertical fins. I ended up covering these up with the photo etch FoD covers but it was a good lesson anyway.
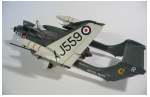
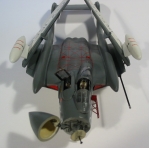
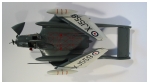
The nose on this kit is horridly inaccurate so rather than play around with trying to reshape it, I instead opted to open it up and build the radar assembly from scratch. The nose is still incorrect but it's less noticeable with it hinged open.
Next the elevator and ailerons were cut off and slightly repositioned. I like to do this as I find it gives the aircraft a little more life.
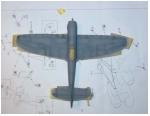
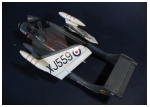
Once the basic fuselage was together I re-scribed the top half of the fuselage and both sides of the outer wings (because the wings were folded, the underside would be most visible)
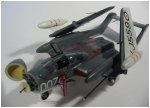
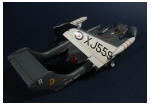
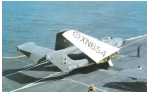
Next up was building the wing fold from the Airwaves photo etch set. The kit includes two sets of outer wings, one for the wings down and the other in the folded position. This really helped with putting on all the photo etch details.
Looking at the instructions for the photo etch wing fold, it seemed to me that there was no way those tiny bits of metal were going to hold the weight of the wing, and if it could sustain its weight it was obviously going to break with the slightest touch.
To strengthen the wing fold I drilled two holes for each wing, bent some wire and used it as a hinge. The wire was far too thick for the 1/72 aircraft but in the end I would rather have something that could stand the odd knock rather than something that needs constant repairs.
I attempted to hide the bulky hinge details with some if the photo etch but it's still very visible. I also didn't use anywhere near all the parts required for the wing fold, there was just no way I could get all those tiny sub assembly parts together and stuck to the kit. In hindsight, it would be much easier to scratch build the details with stretched sprue and good reference photos.
This has been a common experience for me with photo etc, I don't know if I'm simply doing something wrong but trying to glue those tiny bits together with superglue just doesn't seem to work. Especially when you're trying to glue the sharp edge of photo etched part to a flat part.
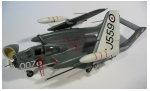
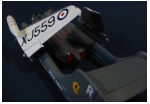
Painting was the Fleet Air Arm colours of Extra Dark Sea grey over white. I didn't bother with any pre-shading on this as the aircraft seemed to be quite clean in the photos I found.
The decals I had did not include any of the red 'no walk' areas so before I painted the top of the fuselage EDSG I covered it in red. Then I masked off all those red walkway lines with very fine masking tape and proceeded to spray the EDSG.
Removing the masking tape revealed the fine red lines underneath, I was quite pleased with this and was much easier than trying to spray the red on top of the EDSG. I guess you could make your own red decals to do this, but at the time I didn't have any blank decal film and was more comfortable using the mask/spray method.
After painting I gave the surface a light polish with a lint free cloth, I find this is a good way to get rid of any bumps or imperfections with the finish before applying a gloss protective coat. Future was then sprayed over the entire model and left for a few days to strengthen.
I originally wanted to use the decals that came with the kit as they included the skull and cross bones on the nose and the flying fist on the tail fins. However these didn't go on very well at all and looked horrible on the kit due to being out of register. The white on the decals turned to a light grey after they were placed on the EDSG.
They did however stick! and were only removed by sanding the little suckers off which required more painting in some parts.
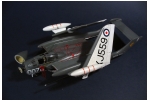
So in the end I used Model Alliance ML72121 which has a selection of aircraft from the HMS Ark Royal. These decals are outstanding and worth every cent. You can bet I'll be building a few more Ark Royal birds from this decal sheet :)
I added a few oil stains here and there and a very small amount of grey chalk rubbed into the center of some of the panels to simulate sun bleaching but I wanted to keep the airframe reasonably clean as they seemed to appear in the photos I saw.
The refuelling probe was from the kit however I sourced some of my wife's needles to use for the outer wing probes. Using kit parts or stretched sprue was just going to break here, and it's far more fun when you can impale yourself on on of your kits.
This was a huge project for me that took about 18 months to complete. Mostly this was due to me constantly shelving it in favour of doing something else. I feel the result was 'average' There were quite a few firsts in this kit for me and the seemed to go ok but I think I would have preferred the final result to look a little better.
I think near the end I rushed it a little just to get the job done, which caused a few problems. But I was determined not to shelf it any more.
Check out our new Online Scale conversion tool. Convert from any scale in any unit of measurement to any other scale in any other unit.