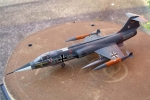


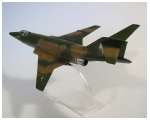
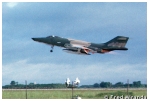
Today we have the RF-101C Voodoo. There really are some aircraft which really should only be displayed with the wheels up. I think the recon Voodoo has to be one of them with it's sleek lines giving it a speedy appearance.
The Voodoo doesn't seem to have been a hugely popular subject for manufacturers in 1/72nd scale and as far as I know, there are no newly released revisions so your best bet is to find one second hand somewhere.
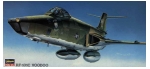
Hasegawa's Voodoo offering is quite dated with small raised panel lines and very little detail anywhere else.
The cockpit includes an average seat with decals provided for the cockpit control panels. The canopy is also a single clear part so you either take the easy road and put in the supplied pilot and keep the cockpit closed (as I did) or you might want to either scratch build or purchase some aftermarket details.
Decals are provided for three versions:
The decals are nicely printed, go on well and provide a good deal of stencil data
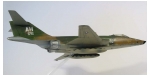
Just the two fuel tanks are provided as the recon version didn't carry any weapons.
For me, this kit was quite easy to build - there are only a few parts and everything fits together quite nicely. You do need to pay a bit of attention to the airbreaks which can be displayed in the open position. If you want to close these you'll probably need to do a bit of sanding and filling, I certainly did.
Because I wanted to display this aircraft in-flight I also needed to raise the gear which included a bit more filling and sanding to get a reasonable finish.
This was also one of the first kits that I re-scribed. I sanded off the existing panel details and re-scribed it with the tip of a new blade, drawing it backwards over the panel line until some plastic is removed. I started re-scribing this kit because it didn't have many details and there wasn't many nasty curves to get around. The result wasn't so great but it was a good learning experience.
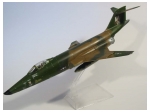
Thinking that I would be more efficient I painted this at the same time as I did my F-100 Super Saber. Because they both had the same Vietnam era SEA camouflage I thought it would considerably reduce painting time by doing two at a time.
In the end it didn't really save much time at all because most of the time is spent masking, the time spent actually spraying is quite minimal.
To start with I pre-shaded the kit by spraying the panel lines and other areas black. Then the final paint job was applied over the top.
To mask the F-101 Voodoo, I used blue tac rolled up into very small sausages which formed a nice 'feathered' look between colors. On the F-100 Super Saber I used standard masking tape cut cleanly. I did this so I could trial both methods and see which one came out best.
Personally, I think the F-100 came out best with its sharper camo lines. The idea behind using the blue-tac is to create deformations between colors which will make the result look more realistic as the real aircraft were simply sprayed.
However, if you stand back far enough from the real aircraft (far enough back that it is in 1/72nd scale) you'll find that the gradient between the colors no longer looks so smooth. That's my reasoning anyway, feel free to discuss.

I used the kit decals because the looks to be good quality, I didn't have any third party sets and the kit supplied decals for the SEA Camouflage version which was what I was after for this one.
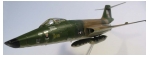
After a standard coat of future floor polish the decals went on with no problems really. I do recall that I didn't bother with a final coat to seal in the decals and because of this there is a bit of silvering showing through, which is my own fault for being lazy.
After the decals had settled down I applied a small amount of paint chipping to various panels. This is really subtle but just the effect that I was after, it's so easy to get carried away when weathering. Better too little than too much.
All in all I was happy with the build. If I had done it on its own it wouldn't have taken long at all and it does look good on the display cabinet.
Check out our new Online Scale conversion tool. Convert from any scale in any unit of measurement to any other scale in any other unit.