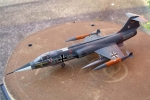


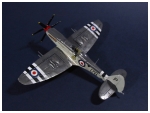
The Supermarine Seafire was a single-seat, single-engine, carrier-based fighter-bomber used by the British Fleet Air Arm during the Korean War.
A Spitfire prototype first flew on 5 March 1936, and the first Spitfire entered Royal Air Force service in July 1938, becoming famous during the Battle of Britain as the chief opponent of the German Me-109. The Seafire was a naval conversion of the Spitfire adapted for carrier operations. First delivered in January 1942 more than 2,400 Seafires were built. It entered service in June 1942 and served throughout the rest of World War Two.
The Seafire Mk 47 served for a few months during the Korean War, equipping one squadron, No. 800 Squadron, which operated from the British light aircraft carrier HMS Triumph. The Seafire Mk 47 had a 2,350-hp engine, could reach 452 mph, and was armed with two 20mm cannon and four 0.303-inch machine-guns.
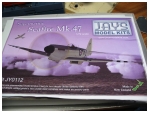
Jays Model Kits is a new kid on the block who have taken over the production of Venture's line of kit sets. Both Jays Model Kits and Venture are/were New Zealand based kit manufacturers. Because these kits are produced in a more limited run from other mainstream kits you need to tackle them from a different angle.
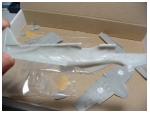
Plastic parts are included for the standard wings and fuselage with a small metal part included for the Spits odd circular control column. A nice touch is the metal mesh that is used to cover the engine cooling intakes.
Something I found pleasantly surprising was the level of detail on the surface of the kit. The panel lines are recessed and finely done. I didn't bother to check how accurate they are but they looked good enough to me.
The Kit supplies some decent instructions, nicely printed reference photos of the cockpit and a good painting guide. The decals provide options for two aircraft and also have a good amount of stencil data. The decal quality is excellent, very cleanly printed and sharp.
There is a little flash on the sprue and there's a bit of work needing to be done with the inside of the fuselage and wings, but this can only be expected from a kit of this nature.
The kit cost me around $20 NZD (about $12USD) and for this price they are excellent value for money.
At this stage I think they are only available directly from the Jays Model Kits online store
Read the instructions. No really. Even though there are only a few pieces to this kit you'll be far better off to know exactly what you're getting yourself into.
Part of the instructions read:-
"The key to success with this and all kits is careful parts preparation before cementing, rather than using quantities of filler afterwards."
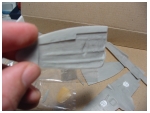
This could not be more true, there is a decent amount of preparation required on the parts before they will fit together nicely. Fortunately I scored myself a dremel type tool a few days before starting this kit which soon became invaluable in removing plastic to get the parts to fit together. The dremel can remove large portions of plastic in a fraction of the time it would take to do the same thing with blades, files and sandpaper.
After spending a good deal of time preparing the parts I found that the fit was very good. I did have a small gap that needed full in the left wing root but aside from that the only other filler was on a few sink marks.
I scratch built a small amount of detail into the wheel wells then moved onto the cockpit. Using the excellent reference photos which were included with the kit and a few good images from the Internet I was able to scratch build a pretty decent looking cockpit. After the building of the 'office' was complete I coated the cockpit with a covering of future floor polish and left if for a few days to cure. The same was done to the wheel wells.
Once the future had dried I applied a few washes with Humbrol smoke to amplify the shadows. I then mixed the cockpit colour with some white and did a little dry brushing to bring out the higher areas. I was quite pleased with the result but never thought to stop and take a photo at this point.
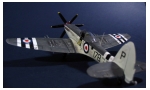
I also cut out the cockpit entry door and replaced with a scratch built alternative and cut out the rudder to re-position it slightly.
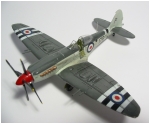
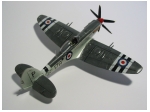
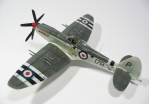
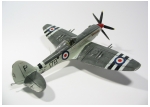
Pretty standard affair for aircraft of the FAA, Extra Dark Sea Grey over Sky. Before applying these I gave the model a wash down with dishwashing liquid to remove any grease from handling which can cause some serious problems when trying to airbrush.
I first pre-shaded by spraying the panel lines with black; once this was dry I applied sky to the lower half of the airframe. A few days later I masked the lower part off and applied the Extra Dark Sea Grey to the upper surfaces.
The kit does provide decals for the black and white invasion stripes but I find it much less stress to simply paint them on rather than fiddling with decals. I masked the full invasion stripe area, painted it white then using the decals as a guide I cut strips of masking tape and applied them to the wings and fuselage.
I was careful here to also leave a space on the side of the fuselage for the "Royal Navy" and serial No. decals. This is where the black and white painting instructions were a little vague, it seemed to indicate that the space under the Royal Navy should be left white, however the pics that I found seemed to indicate it should be fuselage Sky. I left it sky.
This worked out really well, however in twist of ironic fate - after checking the painting instructions I found that I had applied too many stripes to the fuselage!
That's when you reach one of those moments when you say to yourself "ahhh sod it, I'll just leave it, nobody will ever notice. 10 Minutes later I was re-masking and re-applying the Sky and EDSG over the extra black and white stripes :) I knew it was always going to bug me if I left it.
The prop was painted standard humbrol red and prop blades black. The prop is my biggest disappointment with the final result; I should have spent a bit more time here to get it looking a little better. Perhaps one day I'll pull the sucker off and have another go.
I'm deciding if I should spray a flat coat over the whole thing. Looking at the photos it seems a little too shiny for my liking but the reference photos I found seemed to indicate these birds were reasonably bright.
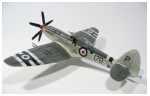
The decals themselves look very nice indeed, the printed crisply and nicely in register. With a little micro set and sol they behaved well and sat down well enough.
Once point of confusion for me were the roundels. The instructions indicate that this aircraft should use six roundels that are all the same size. The decal sheet includes roundels, but thet are all noticeably different in size. For the underside, I ended up using some decals from an old Novo attacker kit that were the correct size.
The wing decals really didn't come out well at all on the invasion striping as you can see the black underneath the white ring on the decal. With a little forethought I could have left the circular area white.
Once the decals were on I sprayed a coat of Future and then added a wash of Smoke to bring out the panel lines. Once that was dry I added some oil stains here and there, added the engine exhaust smoke stain and applied some silver paint chipping to areas that would see a lot of use.
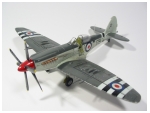
I'm happy with the result, considering it's 1/72 scale and not a mass produced kit I feel that I did a good enough job to put it on the shelf with the other Fleet Air Arm birds.
The kit is a good one though, a modeller with greater skills than I - and a little more patience could really turn this into a beauty.
I now have another Jays Spitfire (Mk. 17) in the stash waiting to be built which will hopefully be an improvement.

Check out our new Online Scale conversion tool. Convert from any scale in any unit of measurement to any other scale in any other unit.